
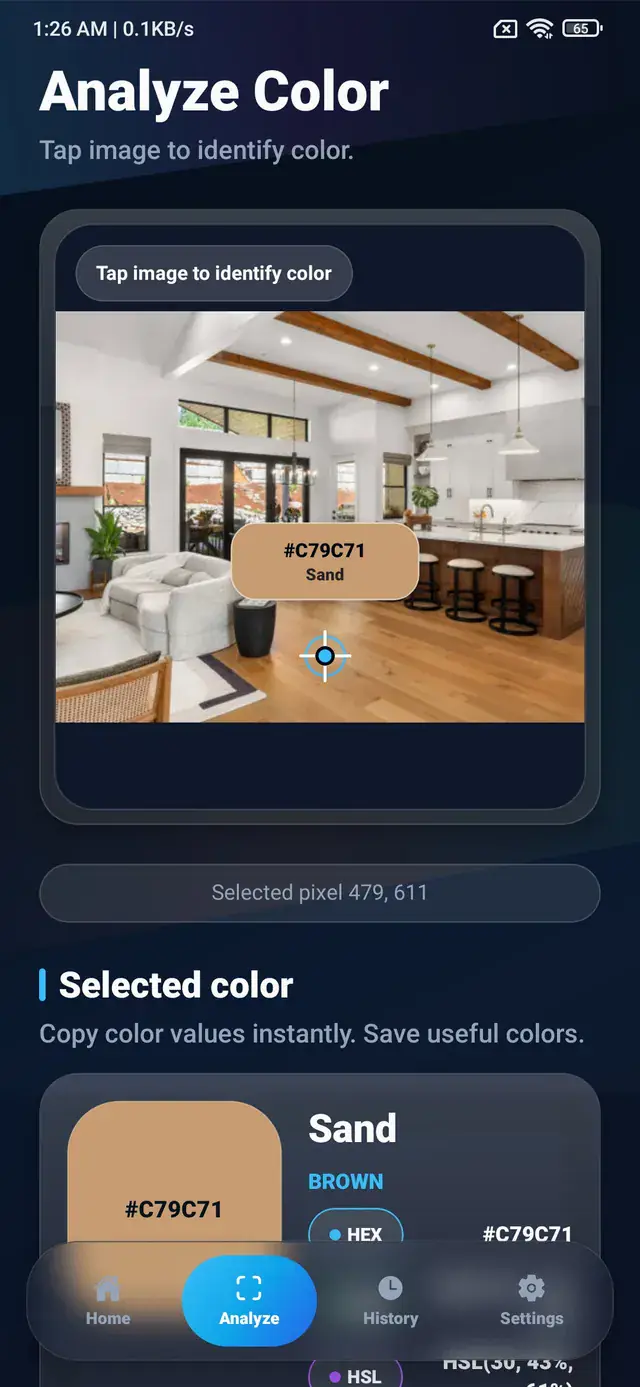
Quick answer: Open a gallery image or camera photo in a color identifier, tap the precise area you want to inspect, and review the resulting color name and color codes. The ColorSnap app presents HEX, RGB, HSL, and CMYK values together so the result can move into a design or development workflow.
Why identify a color from a photo?
A color in the real world rarely arrives as a ready-to-use code. You might notice a wall color in an interior photo, a button color in a screenshot, a fabric tone in a product image, or a useful accent in a poster. A photo color picker converts that visual reference into values that software can understand.
This workflow is useful when:
- recreating a visual style from a reference image;
- documenting colors for a brand or mood board;
- translating a screenshot into interface styles;
- comparing paint, fabric, product, or material colors;
- studying how colors work together in a photograph.
The result is more practical than estimating by eye because it gives you a repeatable starting point.
Step 1: Choose the best source image
Start with the clearest image available. A high-resolution gallery image normally gives you more precise areas to tap than a heavily compressed image. If you are taking a new camera photo, use even lighting and keep the camera steady.
Avoid strong reflections, deep shadows, and colored light when the goal is to approximate the physical object. Those conditions change the pixels captured by the camera, so the detected value may represent the lighting rather than the object’s base color.
Gallery image or camera photo?
Use a gallery image when the reference already exists as a screenshot, downloaded image, design export, or saved photograph. Use a camera photo when the color comes from a nearby object, room, package, plant, artwork, or material.
ColorSnap supports both paths. After selecting the source, the analysis screen lets you inspect a specific point rather than averaging the entire image.
Step 2: Tap the exact area you want
Move to a clean section of the color and tap the target point. Small changes in position can produce different results because nearby pixels may include texture, antialiasing, highlights, shadows, or compression artifacts.
For a more dependable reading:
- Tap a flat, evenly lit area.
- Avoid boundaries between two colors.
- Compare two or three nearby points.
- Use the repeated or central value as your working reference.
This matters especially for textured surfaces such as wood, fabric, skin, stone, and printed material. These surfaces contain natural variation, so one pixel should be treated as a sample rather than a complete measurement.
Step 3: Read the color name and codes
Once a point is selected, the Android color identifier app can display several descriptions of the same color:
- HEX is compact and common in web design and CSS.
- RGB describes red, green, and blue light values.
- HSL separates hue, saturation, and lightness for intuitive adjustment.
- CMYK provides a print-oriented reference.
- Color name gives the shade a readable label.
For example, a sampled tan shade might appear as #C79C71, RGB(199, 156, 113), and an HSL value describing its hue and lightness. Each format represents the same detected pixel in a different way.
Step 4: Copy, save, or share the result
Choose the format that matches your next task. A frontend developer may copy the HEX value into a CSS custom property. A designer may save the shade with a project palette. An artist may keep the color name and RGB values as a study reference.
ColorSnap also keeps useful colors in history and favorites, which helps when you are sampling several areas from one image or comparing colors across multiple references.
:root {
  --reference-sand: #C79C71;
}
How accurate is photo color identification?
Photo-based color detection identifies the pixel stored in an image. It does not guarantee an exact physical measurement of the original object.
Results can vary because of:
- camera sensor processing;
- white balance and exposure;
- room or outdoor lighting;
- screen calibration;
- image compression;
- reflections and shadows;
- edits or filters applied to the photo.
For interface design, digital artwork, and visual references, the pixel value is often exactly what you need. For manufacturing, paint matching, print production, or other color-critical work, compare the result with calibrated equipment and physical samples.
From one color to a complete palette
After identifying one useful shade, inspect other areas of the same image or use palette extraction. A room photo might provide a warm wood tone, a soft neutral, a dark structural color, and a green accent. Together, those colors can become a practical design direction.
The important step is to keep the source and purpose in mind. Pick individual pixels for precise references, and use an extracted palette when you want to understand the broader visual balance of the image.
Practical checklist
- Use a clear image with balanced lighting.
- Tap inside a consistent color area.
- Compare nearby pixels before choosing a value.
- Select the code format required by your tool.
- Save important results with meaningful names.
- Treat camera results as image-based references, not laboratory measurements.
With those habits, a photo becomes a useful source of named, reusable color information on Android.
Explore ColorSnap color tools
Start from the ColorSnap homepage or review the complete app features. For focused workflows, learn about the Android color identifier, use the photo color picker, or explore the image palette generator. The ColorSnap FAQ answers common questions about formats, images, saved colors, and app usage.